
Civil engineering courses are like no other in the science/engineering disciplines. Perusing through any university’s Civil Engineering Major course catalog, one will find an array of obvious, straight-forward course titles such as: Steel, Concrete, Soil Mechanics, and Fluids. Civil engineers often pride themselves in the practicality of their technical prowess, and many of the core-courses schedule their instruction to delicately and timely highlight the alliance between the exhaustive derivation of a principal mathematical relationship with the practicality of hands-on implementation of such equation through the physical laboratory section. In these physical laboratory sections, students are (typically) divided into small groups (4~5 students) and work together to complete or perform experimentations that are relevant to the civil engineering discipline and industry. Aside from the students developing collaborative and practical skills, the laboratory sections provide an arena to learn “hands-on” how the theories and concepts taught in the lecture portion apply to the everyday engineering and practicality of our discipline. I can personally attest to the impact these physical laboratory sections had on me as a student in my comprehension of the subject matter, as well as my desire to pursue a career in a civil engineering-based discipline.
Of course, by now it is probably apparent how the Covid-19 pandemic has brought a multitude of challenges to the “physical” laboratory front in the civil engineering course work. Mainly, how do we as educators provide “hands-on” physical laboratory sections when we can’t physically share the same space? Moreover, in the new remote instruction format, how can we keep the students’ engaged and interested in the laboratory content, and how can we monitor student activity? The solution I found worked best for my class was to create short and personalized instructional videos, highlighting the key aspects and data collection for each lab. Engaging instructional videos, coupled with the student activity monitoring implemented through Canvas Studio, has done an adequate job of simulating the in-person hands-on nature my courses physical laboratory sections while we are unable to meet together.
A primary goal of mine when story-boarding, recording, and editing my videos, is to create something that I would enjoy watching. For this, I received inspiration from the wonderful world of social media and content creators who make educational videos for a living on YouTube. “Youtubers” such as Destin Sandlin (Channel: SmarterEveryday) and Dr. Derek Muller (Channel: Veritasium) have been creating educational videos that I have enjoyed watching for years now; going back to when I was a student. In their YouTube Channels, they skillfully intertwin education with entertainment through short and dynamic videos presenting and discussing various science topics in a relevant manner. What also makes these channel’s so appealing is the personality of creator apparent through the editing and presentation styles of each “youtuber.” Their utilization of unique editing and clever graphics keep my attention through the whole video, even if the topic is not originally one of interest to me. These simple engagement techniques were something I hoped to emulate for my course laboratory videos, while focusing the topic on a specific single experiment and subsequent data collection. Figure 1 below shows two screen shots from a Youtube Video produced by Destin Sandlin on his “SmarterEveryDay” channel where he discusses the science behind the fluid mechanics phenomenon of Laminar flow, and shares several examples of this phenomenon occurring in nature and in everyday life.

Obviously, there is a significant gap between my ability to produce educational videos for my course, and a “professional” youtuber who’s videos attract millions of views each week. However, many of the aspects from these professionally-created/edited videos, I attempted to recreate and implement (scaled down of course) for my lab videos. Below is a list of a few key video elements I tried to implement in my lab videos; in efforts to keep students engaged and interested.
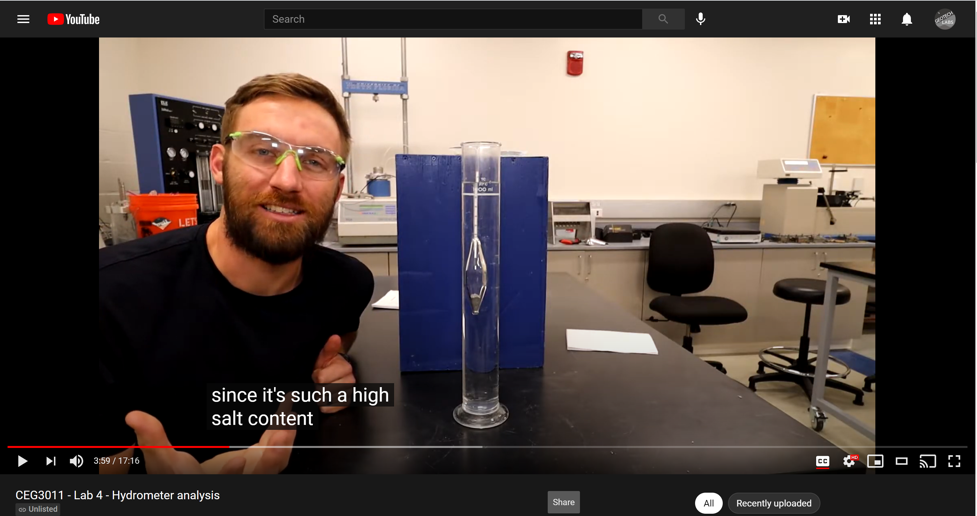
Personal: In a typical laboratory section that is offered in person, I would be instructing the student groups in the lab with them, walking them step by step through the materials, procedures, and data collection processes. Therefore, in my videos I wanted to both be clearly seen and heard to simulate the discussion and interaction associated with a typical face-to-face lab. The beginning of the video always starts with me briefly explaining the lab components and importance, talking straight to the camera. Likewise, the ending scene always consists of me explaining the next steps students need to take to complete their lab reports. I wanted the videos to seem as authentic as possible and for the students to know that I truly care if they comprehend the information presented to them. An example of this is shown in Figure 2, as I am making eye contact with the students, explaining the importance of calibration of a piece of equipment we use.
Dynamic: There are a plethora of “educational” style videos posted on YouTube which simply (and unfortunately) consist of a 40-minute-long static camera shot of one person explaining/presenting a topic. Many civil engineering students already painstakingly sit through multiple 45-minute zoom lectures a day, so I aimed to make my lab videos short, concise, and dynamic. This is where story-boarding and editing plays a crucial role! Prior to recording, I plan out the sections which involve the most important information of the lab and utilize various camera angles, recording techniques, or clever editing to bring the viewers attention to that specific part of the video. Some examples of this are limiting the time a static shot is being shown, switching from a tripod to a hand-held camera between consecutive shots, or quick video transitions and graphics to relay information (example shown in figure 3). Again, the goal is to keep the flow of the video moving forward and to keep the students engaged and interested, hopefully avoiding the urge to click-through the video time-bar towards the end.

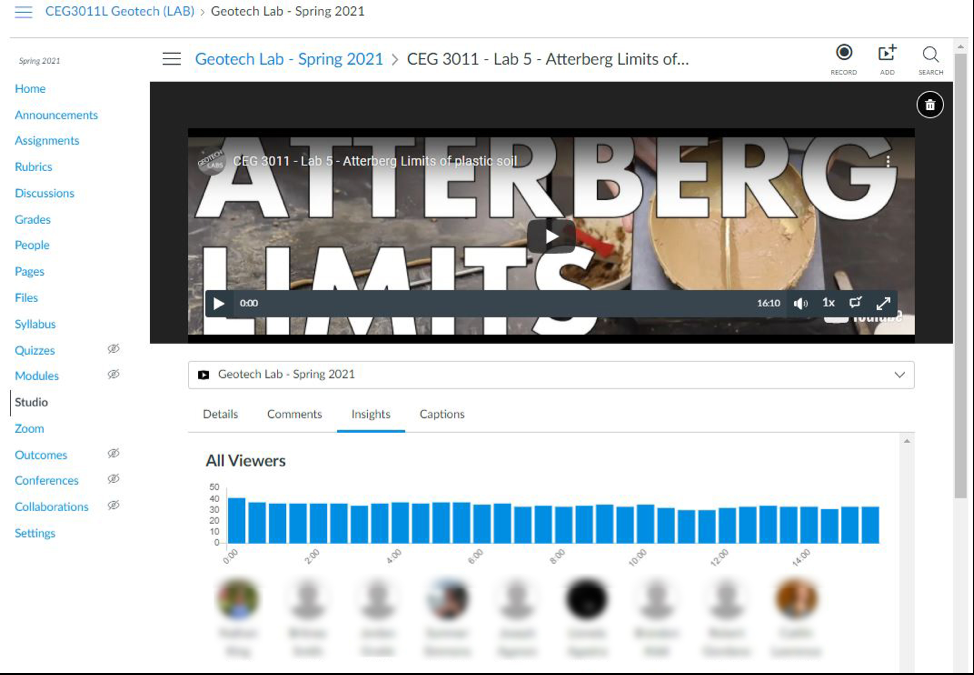
Interactive: Along with the videos being entertaining, they first and foremost need to be informational. To ensure each student is watching the entire video and that they are comprehending the content, I attempt to make the videos as interactive as possible. I found it best to not simply review the lab procedures in the videos, but to actually perform the lab experiments step by step; again, simulating the in-person experience. The students are also required to record and report on the data that I am presenting to them in the video (as shown in figure 4), ensuring that the entire videos are viewed from start to finish. To aid in this verification of student in engagement, I utilize Canvas Studio which conveniently provides a list of all students who watched the video in its entirety and at what time they may have fast forwarded to clicked out of the webpage (Figure 5). These video analytics are used in my grading of class participation, as well as for personal feedback to my videos through identifying which sections may be too long or non-interactive to retain student’s engagement.

Below are links to two of my Lab videos for the CEG3011 (Geotechnical Engineering) course. All course content on youtube is set to “unlisted”, where only viewers with the link are able to watch and the videos will not appear through a cursory search. I embed each video directly into the course’s canvas page through canvas studio, allowing the students to access all required laboratory information on one page without the use of external websites.
https://youtu.be/5p01O5rEFTI & https://youtu.be/SpMbHKMjcdA
For editing and exporting of videos, I use the UNF license of Adobe Premiere. There is a learning curve associated with this software, but there are exceptional tutorials available online which highlight the basic steps needed to edit and produce these types of videos. Typically, I can create a single video (planning, recording, and editing) in roughly 6-8 hours. If the lab section was face-to-face, my contact hours would be similar (if not more) given the time required to prepare, perform, and clean after each of the laboratory sections (typically four per week, for 8 weeks per the semester.)
When face-to-face laboratory sections resume, I plan to still use these videos as a supplemental resource for current and previous students. Some areas of improvement include more efficient time management in planning, which will hopefully cut down on over-all video length. My current videos average a length of 18-20 minutes long and I would like to keep each one under 15 minutes.
In the two semesters I have created these lab videos, I have generally received positive feedback from the students. Below are a few examples of positive feedback from the ISQ results for Fall 2020 (Civil Engineering Materials Course, CGN3501).
“Even though it was online, the lab videos you prepared were very informative and demonstrated the concepts well. They were well edited too. The slides and ASTMs were really good for figuring out the concepts and then the process of the labs as well. I also really appreciated how the labs actually corresponded directly to what we were learning about at the moment. Helped a lot to be able to visualize what everything we were learning and see it played out.”
“Honestly the best online lab (and lab in general) I have had so far! Dr. Shamet’s videos are amazing (very entertaining and informative), where you can see all the effort he has put in for this course. I also really like the fact that he assigned the lab groups for the semester, and that we weren’t switch around.”
“Despite not being able to do a hands on experience with the lab, the professor did some marvelous work executing video labs and explaining what was expected. Definitely one of the most enjoyable labs I have taken at UNF despite the fact that it had to be on an online platform. This class should serve as an example to other labs on how to adapt to an online platform for what should be taught in person.”
Although nothing will ever replace the in-person laboratory experience, I believe these lab videos have provided a valuable experience for our students and have effectively related the course content to the practicality and application of civil engineering.

